The Most Reliable Parental Control App
FamiSafe lets parents control screen time, track real-time location and detect inappropriate content on kids' devices.
The 21st-century kids are fond of online games. They better understand how it feels to spend time with buddies in their bedrooms competing with each other holding joysticks or keyboards in their hands. Although online games have limited kids’ participation in outdoor games, they have also provided a source of endless entertainment and fun.
When it comes to game development, only professional developers and designers understand the hard work required to develop exciting games for kids. What if you come to know even beginners with no or limited game development experience can also program their favorite games online? Seems unbelievable, but it’s a reality.
Read this article to learn what Roblox studio is and how to make games with this online gaming platform for free.
Part1. What is Roblox Studio?
Roblox Studio is an online game development platform and creation system that allows users to develop exciting games online with limited expertise in game development. The program offers a comprehensive and intricate set of coding and building tools for creative expression. You can create the places of your dreams with Roblox and gain a greater sense of control over your programs.
The best thing about Roblox Studio is that both novices and experienced programmers can access its features. From simple manipulation to developing complex game functions, the platform gives users the freedom to develop, script, and test high-quality games and monetize their efforts by uploading these games on the internet. You can also play games developed by other users on Roblox Studio and share your feedback about the gaming experience.
Benefits of Roblox Studio for Kids
Here’s how Roblox Studio improves kids’ creativity and polishes their programming skills:
A Perfect Springboard to Learn Programming
Computer programming is too complicated to learn, at least for young kids. Some children may find it very intimidating, but Roblox Studio makes it very easy, interesting, and fun to learn to program. It’s not a platform where kids have to take long lectures on programming; instead, it gives natural and easy answers to questions like “Why am I learning this” and “making a game in Roblox.” This way, the platform encourages children to customize the game’s features as per their preferences and learn to code creatively.
Make Your Children Think Out of the Box
Playing games developed by others is very easy. However, playing a game developed by yourself gives a unique sense of pleasure and adoration. Roblox Studio gives children an opportunity to showcase their creative skills and think differently to develop something superior and more interesting than they used to play online.
An Excellent Source of Generating Passive Income
The monetization potential of Roblox Studio can be determined by the fact that the top game developers on this platform earn over $2 million annually. It offers innovative opportunities to earn money through in-game purchases. The program is very easy to get started and allows kids to earn passive income in addition to increasing their coding and game design knowledge.
Part 2: How to Make a Game with Roblox Studio?
Although we have discussed the importance of Roblox Studio, the real question remains unanswered: “How do you create a game on Roblox?” It’s very easy, but before we explain the steps involved in game development with Roblox Studio, let’s first understand the Roblox Studio interface.
Overview of the Studio Interface
The Roblox Studio Interface has several sections:
1. Menu Bar
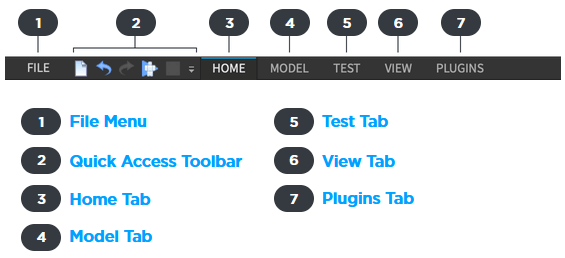
The top of the Studio window has a menu bar that contains File Menu and Quick Access Toolbar as well as various tabs such as Home, Model, Test, View, and Plugins.
2. Ribbon Bar
The Ribbon Bar contains the tools that change when users click on the Menu Bar tabs.

3. Game Editor Window
This window displays the progress of the game design in real-time.
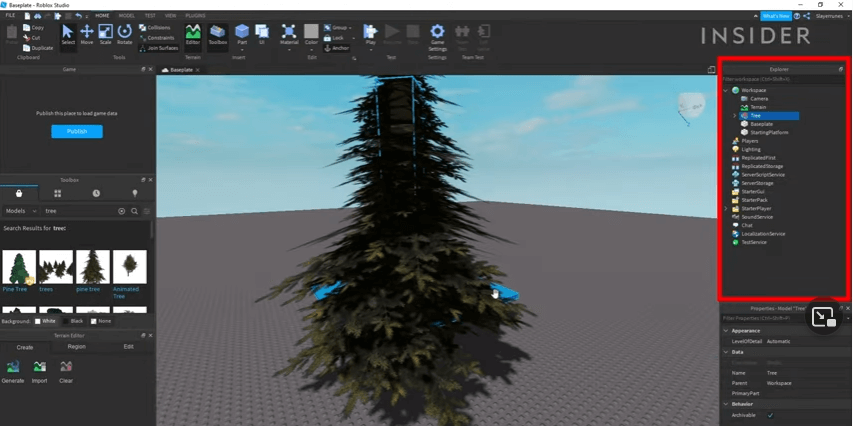
4. Explorer Window
This window contains the list of all objects inside a place.
5. Properties Window
This window is used to change the properties of multiple parts selected in an object.
6. Asset Manager
This window allows users to bulk import multiple game assets and manage images, packages, meshes, and images in the game under development.
7. Toolbox
It comprises all models, meshes, images, and audio files published by you, your groups, or Roblox community members.
Detail StepsDevelop Your First Game with Roblox Studio
Step 1: Choose the Game Template
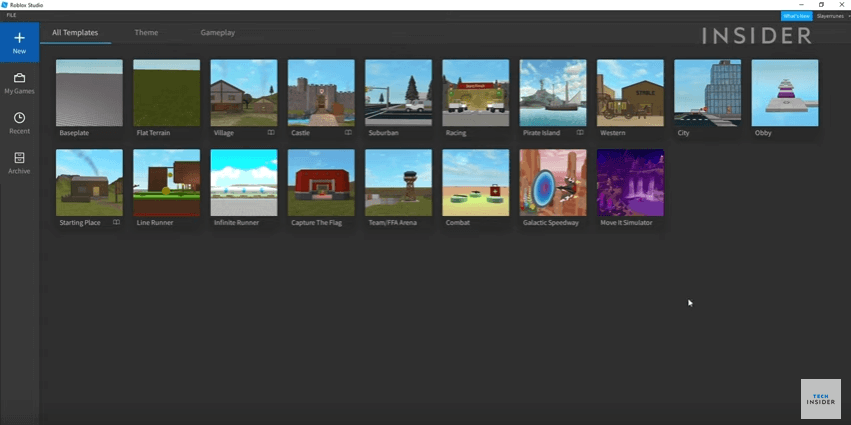
First of all, launch the Roblox Studio, tap the “New” button, and choose a game template from the available templates to start.
Step 2: Place Objects
Next, you have to place different objects in your chosen template. For this purpose, click on the Model tab in the menu bar and select Part. Here, you can find the basic building blocks required to create models and geometry in your game such as spheres, blocks, cylinders, and wedges.
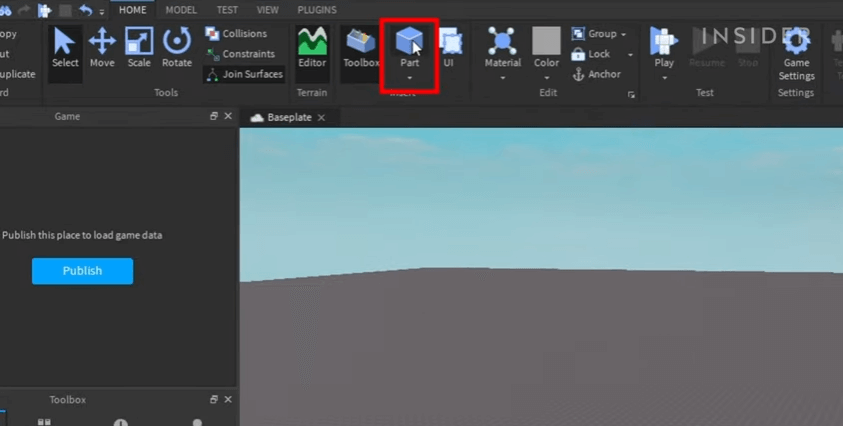
Step 3: Change the Object Size, Pitch, and Direction
After you have selected an object, change its size using the Scale tool. Make sure you hold the Ctrl or Command button while scaling your object. You can also grow or shrink your object in both directions. Similarly, use the Rotate tool to change the object’s pitch or roll off your parts and the Move tool to move your parts along the x, y, or z-axis.

Step 4: Change the Object Properties
Now, use the Properties panel to change the object’s color, transparency, and reflectiveness. You can also change the object behavior and choose where it will be anchored, can collide, massless, locked, and archivable. Similarly, select the Name tab in the properties panel to change the object’s name.

Step 5: Spawning
To add the ready-made objects in your game, open the Toolbox and search for the relevant item by entering its name in the search bar. Objects added to the game can also be found in the Explore under the workspace tab. Turn of Collusions from the Model tab in the menu bar if you want your parts to face each other. Similarly, add the spawn points using the same Model tab and set the Can Collide option to false so that the players can walk through your spawn points. You can also add duplicate spawn points by clicking the object place and pressing Ctrl + D.
Step 6: Scripting
To add unique functionality and models like lava bricks into your game, go to the Scripting, select a particular model in the workspace, tap the + icon, and click on script. A basic “Hello World” script will be added to the object. This is all about the Lua programming language used by the Roblox Studio. The basic script that will kill the player once it touches the lava brick is shown in the figure below.
Step 7: Game Assembling
Once all the basics have been added, it’s time to assemble your game. For this purpose, add a basic platform, lava bricks, and a landing platform at the start and end of the path. To ensure everything works perfectly, go to the Test tab and click on the Play button.
Step 8: Publish Your Game
When you’re satisfied with your game, tap the Publish button, click on Create New Game, enter the game description, set permissions, and click Save.

Part 3. How to Set up Parental Control on Chromebook?
Allowing kids to build and play games on Roblox Studio is good, but this activity can become counterproductive in the absence of parental monitoring of digital devices. To address this challenge, follow these steps to set up parental controls on your child’s Chromebook using FamiSafe:
1. Become the Chromebook Owner
To start with, you have to find the Chromebook owner and become the new owner yourself by doing a factory reset to apply parental controls.
2. Turn Off Guest Browsing
After you have gained control of your kid’s Chromebook, you should restrict unauthorized users from accessing that device. For this purpose, turn off guest browsing by logging into your kid’s device with your Gmail account.
3. Block Unverified Users
If you feel some users might misuse your child’s Chromebook, you can block them from the “Restrict Sign-in to the Following Users” option.
4. Use Clean DNS Address
A Clean DNS address blocks potentially harmful websites containing harmful content. Use 185.228.168.168 and 185.228.169.168 DNS addresses in the first and second lines respectively.
5. Apply FamiSafe Parental Controls
Finally, apple the FamiSafe parental controls to monitor your kid’s Chromebook secretly and take actively respond to inappropriate activities.
Part 4. Frequently Asked Questions
Finally, apple the FamiSafe parental controls to monitor your kid’s Chromebook secretly and take actively respond to inappropriate activities.
How to use Roblox Studio on mobile?
You can play games on Roblox on your PC, mobile phone, tablet, or Chromebook. However, you need a PC or Mac computer for game creation since Roblox Studio is incompatible with smartphones and Chromebooks.
Can I Get Roblox Studio on Chromebook?
No, Roblox Studio can’t be downloaded on Chromebook because this platform only supports Windows and iOS. Since Chromebook doesn’t have any of these two operating systems, you can’t get Roblox Studio on Chromebook.
Wondershare Famisafe
FamiSafe lets parents control screen time, track real-time location and detect inappropriate content on kids' devices.
Conclusion
Roblox Studio is an advanced game creation platform supported with high-tech game designing, scripting, and development tools. Users can create their favorite games online by using different features of this platform for free. Besides, you can also play games created by other users on Roblox and enhance your gaming experience.
Roblox Studio is a source of endless entrainment and educational learning. It encourages kids to gain advanced programming skills and allows them to monetize their efforts. However, parents concerned about the wrong use of digital devices can use parental monitoring apps like FamiSafe to monitor their child’s online activities secretly and ensure safe browsing.
